最近在读《Linux内核设计与实现》,在书的开始就要先搭建一个Linux2.6的环境。 为了把环境搭好,折腾了好几天。所以来分享一下搭建流程以及可能遇到的坑。
基础环境说明
操作系统(虚拟机): ubuntu-14.04 64bit (ubuntu-14.04.6-server-amd64) Linux内核: 2.6.26 qemu: 2.0.0 busybox: 1.20.1 gcc: 4.8.4
这里是用虚拟机启动ubuntu进行编译,然后使用busybox制作根文件系统,最后用qemu模拟器来启动编译好的Linux。 强烈建议使用上述相同的环境进行编译,不然会遇到很多坑。个人觉得入门的时候没必要把时间浪费在这上面。
这里编译的Linux内核是32位的,原因是在使用这个版本的qemu和gdb在调试64位系统的时候会遇到bug。 当然直接选择32位的ubuntu也是可以的,编译的时候会更简单,不过我用的vscode remote不支持连接32位系统。 有兴趣可以了解下什么是根文件系统
下文主要介绍Mac下的安装流程,Windows/Linux环境下也大致一样。
搭建流程在Windows和Mac环境下都完成过。
系统环境安装
1.使用vagrant创建虚拟机
vagrant 是一个虚拟机管理软件,可以简化虚拟机的创建和销毁流程。它实际上还是使用virtualbox创建虚拟机。如果不想使用vagrant,可以直接使用virtualbox/vmware。
$ echo """Vagrant.configure("2") do |config|
  config.vm.box = "ubuntu/trusty64"
  config.vm.box_check_update = false
  config.vm.network "private_network", ip: "192.168.33.100"
  config.vm.provider "virtualbox" do |vb|
    vb.cpus = 2
    vb.memory = "1024"
  end
end
""" > Vagrantfile

$ vagrant up
$ vagrant ssh
$ sudo su
下面默认使用root权限进行所有操作
2.替换国内软件源(阿里源)
$ cd /etc/apt
$ cp sources.list sources.backup
$ echo """
deb http://mirrors.aliyun.com/ubuntu/ trusty main restricted universe multiverse
deb http://mirrors.aliyun.com/ubuntu/ trusty-security main restricted universe multiverse
deb http://mirrors.aliyun.com/ubuntu/ trusty-updates main restricted universe multiverse
deb http://mirrors.aliyun.com/ubuntu/ trusty-proposed main restricted universe multiverse
deb http://mirrors.aliyun.com/ubuntu/ trusty-backports main restricted universe multiverse
deb-src http://mirrors.aliyun.com/ubuntu/ trusty main restricted universe multiverse
deb-src http://mirrors.aliyun.com/ubuntu/ trusty-security main restricted universe multiverse
deb-src http://mirrors.aliyun.com/ubuntu/ trusty-updates main restricted universe multiverse
deb-src http://mirrors.aliyun.com/ubuntu/ trusty-proposed main restricted universe multiverse
deb-src http://mirrors.aliyun.com/ubuntu/ trusty-backports main restricted universe multiverse
""" > sources.list
$ apt-get update
- 安装编译环境
$apt-get install -y libncurses5-dev build-essential
$apt-get install -y lib32readline-gplv2-dev # 编译32位系统
- 安装调试环境
apt-get install -y qemu-system-x86 gdb
- 下载linux和busybox
$mkdir linux
$cd linux
$wget https://www.busybox.net/downloads/busybox-1.20.1.tar.bz2
$wget https://mirrors.edge.kernel.org/pub/linux/kernel/v2.6/linux-2.6.26.tar.bz2
$tar -xf busybox-1.20.1.tar.bz2
$tar -xf linux-2.6.26.tar.bz2
Linux编译
- 打patch 在linux-2.6.26文件夹下创建文件fix.patch,复制以下内容
diff -Naur linux-2.6.26/arch/x86/lib/copy_user_64.S linux-2.6.26-2/arch/x86/lib/copy_user_64.S
--- linux-2.6.26/arch/x86/lib/copy_user_64.S	2008-07-13 21:51:29.000000000 +0000
+++ linux-2.6.26-2/arch/x86/lib/copy_user_64.S	2021-04-22 07:04:49.894796787 +0000
@@ -341,7 +341,7 @@
 11:	pop %rax
 7:	ret
 	CFI_ENDPROC
-END(copy_user_generic_c)
+END(copy_user_generic_string)

 	.section __ex_table,"a"
 	.quad 1b,3b
diff -Naur linux-2.6.26/arch/x86/vdso/Makefile linux-2.6.26-2/arch/x86/vdso/Makefile
--- linux-2.6.26/arch/x86/vdso/Makefile	2008-07-13 21:51:29.000000000 +0000
+++ linux-2.6.26-2/arch/x86/vdso/Makefile	2021-04-22 07:05:29.090798510 +0000
@@ -25,7 +25,7 @@

 export CPPFLAGS_vdso.lds += -P -C

-VDSO_LDFLAGS_vdso.lds = -m elf_x86_64 -Wl,-soname=linux-vdso.so.1 \
+VDSO_LDFLAGS_vdso.lds = -m64 -Wl,-soname=linux-vdso.so.1 \
 		      	-Wl,-z,max-page-size=4096 -Wl,-z,common-page-size=4096

 $(obj)/vdso.o: $(src)/vdso.S $(obj)/vdso.so
@@ -69,7 +69,7 @@
 vdso32-images			= $(vdso32.so-y:%=vdso32-%.so)

 CPPFLAGS_vdso32.lds = $(CPPFLAGS_vdso.lds)
-VDSO_LDFLAGS_vdso32.lds = -m elf_i386 -Wl,-soname=linux-gate.so.1
+VDSO_LDFLAGS_vdso32.lds = -m32 -Wl,-soname=linux-gate.so.1

 # This makes sure the $(obj) subdirectory exists even though vdso32/
 # is not a kbuild sub-make subdirectory.
diff -Naur linux-2.6.26/kernel/mutex.c linux-2.6.26-2/kernel/mutex.c
--- linux-2.6.26/kernel/mutex.c	2008-07-13 21:51:29.000000000 +0000
+++ linux-2.6.26-2/kernel/mutex.c	2021-04-22 07:06:51.646802139 +0000
@@ -58,7 +58,7 @@
  * We also put the fastpath first in the kernel image, to make sure the
  * branch is predicted by the CPU as default-untaken.
  */
-static void noinline __sched
+static __used void noinline __sched
 __mutex_lock_slowpath(atomic_t *lock_count);

 /***
@@ -95,7 +95,7 @@
 EXPORT_SYMBOL(mutex_lock);
 #endif

-static noinline void __sched __mutex_unlock_slowpath(atomic_t *lock_count);
+static __used noinline void __sched __mutex_unlock_slowpath(atomic_t *lock_count);

 /***
  * mutex_unlock - release the mutex
@@ -270,7 +270,7 @@
 /*
  * Release the lock, slowpath:
  */
-static noinline void
+static __used noinline void
 __mutex_unlock_slowpath(atomic_t *lock_count)
 {
 	__mutex_unlock_common_slowpath(lock_count, 1);
@@ -315,7 +315,7 @@
 }
 EXPORT_SYMBOL(mutex_lock_killable);

-static noinline void __sched
+static __used noinline void __sched
 __mutex_lock_slowpath(atomic_t *lock_count)
 {
 	struct mutex *lock = container_of(lock_count, struct mutex, count);
diff -Naur linux-2.6.26/Makefile linux-2.6.26-2/Makefile
--- linux-2.6.26/Makefile	2008-07-13 21:51:29.000000000 +0000
+++ linux-2.6.26-2/Makefile	2021-04-22 07:03:43.150793853 +0000
@@ -214,8 +214,8 @@

 HOSTCC       = gcc
 HOSTCXX      = g++
-HOSTCFLAGS   = -Wall -Wstrict-prototypes -O2 -fomit-frame-pointer
-HOSTCXXFLAGS = -O2
+HOSTCFLAGS   = -Wall -Wstrict-prototypes -O1 -fomit-frame-pointer
+HOSTCXXFLAGS = -O1

 # Decide whether to build built-in, modular, or both.
 # Normally, just do built-in.
@@ -502,9 +502,9 @@
 all: vmlinux

 ifdef CONFIG_CC_OPTIMIZE_FOR_SIZE
-KBUILD_CFLAGS	+= -Os
+KBUILD_CFLAGS	+= -O1
 else
-KBUILD_CFLAGS	+= -O2
+KBUILD_CFLAGS	+= -O1
 endif

 ifneq (CONFIG_FRAME_WARN,0)
$patch -p1 < fix.patch
如果patch提示失败,有可能是因为把fix.patch里面的tab转化成空格了,这时候你可以按照上面的内容直接修改源文件。
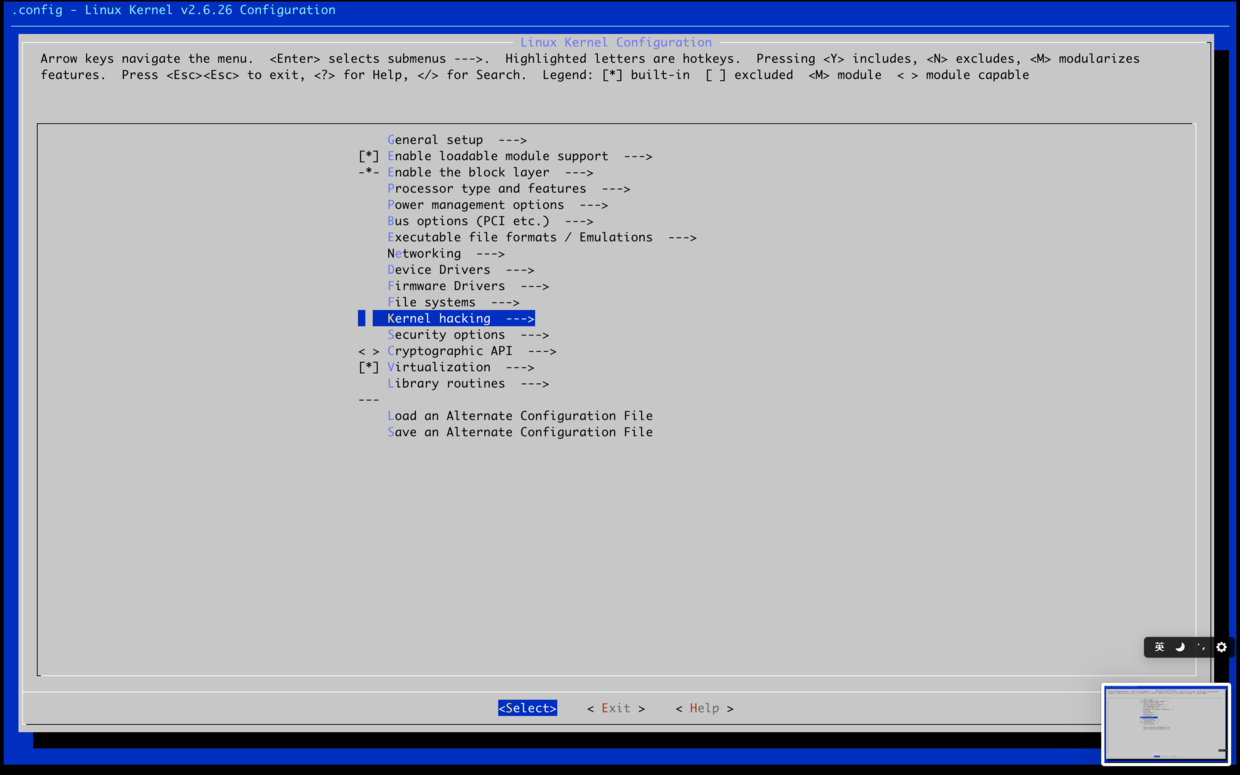
2.设置编译配置
$make ARCH=i386 defconfig
$make ARCH=i386 menuconfig
如果提示 Your display is too small to run Menuconfig! It must be at least 19 lines by 80 columns. 那就说明你的命令行窗口太小,最好切到全屏,再重新配置
开启debug信息选项
选择界面上下进行移动,tab切换下方选项


3.开启编译
$ make ARCH=i386 -j2
-jN 代表多任务并行化,数字一般为cpu核数*2
编译成功后显示
Root device is (252, 0)
Setup is 12288 bytes (padded to 12288 bytes).
System is 2844 kB
CRC 31a57b1f
Kernel: arch/x86/boot/bzImage is ready  (#1)
编译时长跟机器配置有关,一般几分钟到十几分钟。 我用的是18款的mbp 2.2 GHz 六核I7,创建的虚拟机是4核,编译用时5m10s。 如果觉得编译速度太慢,有以下几种方法可以加快速度:
- 改变虚拟机的核数,加大-jN的数目;
- 使用tmpfs文件系统,将代码直接放到内存中;
- 使用ccache缓存每次编译的结果。
创建根文件系统
- 制作镜像
$ cd ..
$ dd if=/dev/zero of=initrd.img count=1024 bs=4096
$ mkfs.ext2 initrd.img
$ mkdir rootfs
$ mount -o loop initrd.img rootfs/
- 创建字符设备
$ mkdir rootfs/dev
$ mknod rootfs/dev/console c 5 1
$ mknod rootfs/dev/ram b 1 0
- 打patch
$ cd busybox-1.20.1
$ echo """diff -Naur busybox-1.20.1/include/libbb.h busybox-1.20.1-2/include/libbb.h
--- busybox-1.20.1/include/libbb.h	2012-05-28 00:46:41.000000000 +0000
+++ busybox-1.20.1-2/include/libbb.h	2021-04-21 07:55:27.526183582 +0000
@@ -12,6 +12,8 @@

 #include "platform.h"

+
+#include <sys/resource.h>
 #include <ctype.h>
 #include <dirent.h>
 #include <errno.h>
""" > fix.patch
$ patch -p1 < fix.patch
- 修改Makefile
vi中输入292G 跳到292行,在最后加上-m32
$ vi Makefilie
CC              = $(CROSS_COMPILE)gcc -m32
- 设置编译选项
$ make defconfig
$ make menuconfig
选择静态链接


关闭shell → job contorl选项


5.编译安装busybox
$make -j2
$make CONFIG_PREFIX=../rootfs install
安装完成后,可以在rootfs目录看到
$ cd ..
$ ls -lah rootfs/
total 20
drwxr-xr-x 5 root root 4096 Apr 21 08:05 ./
drwxr-xr-x 7 root root 4096 Apr 21 08:05 ../
drwxr-xr-x 2 root root 4096 Apr 21 08:05 bin/
lrwxrwxrwx 1 root root   11 Apr 21 08:05 linuxrc -> bin/busybox*
drwxr-xr-x 2 root root 4096 Apr 21 08:05 sbin/
drwxr-xr-x 4 root root 4096 Apr 21 08:05 usr/
6.最后卸载rootfs
$umount rootfs
启动系统
$ qemu-system-x86_64 \
-nographic \
-kernel ./linux-2.6.26/arch/x86/boot/bzImage \
-initrd ./initrd.img \
-append "root=/dev/ram init=/bin/sh console=ttyS0"
使用Ctrl a+x来退出qemu
input: ImExPS/2 Generic Explorer Mouse as /class/input/input2
RAMDISK: ext2 filesystem found at block 0
RAMDISK: Loading 4096KiB [1 disk] into ram disk... done.
VFS: Mounted root (ext2 filesystem) readonly.
Freeing unused kernel memory: 448k freed
/ #
VFS: Mounted root (ext2 filesystem) readonly.
Freeing unused kernel memory: 448k freed
Warning: unable to open an initial console.
Failed to execute /bin/ash.  Attempting defaults...
Kernel panic - not syncing: No init found.  Try passing init= option to kernel.
如果遇到这个错误,一般是根文件系统没创建对,请根据上面的步骤重新创建一遍。
VFS: Mounted root (ext2 filesystem) readonly.
Freeing unused kernel memory: 448k freed
如果提示VFS错误,则是Linux内核编译的时候没有开启ext2的配置,可以回到make menuconfig中开启这个选项。
/bin/ash: can't access tty; job control turned off
如果提示job control,则需要回到busygox编译那里关闭这个选项。
GDB Debug
- 开启debug选项
$ qemu-system-x86_64 \
-nographic \
-kernel ./linux-2.6.26/arch/x86/boot/bzImage \
-initrd ./initrd.img \
-append "root=/dev/ram init=/bin/ash console=ttyS0" -s -S
- 开启gdb 在另外一个终端开启
$cd linux
$gdb --dir=./linux-2.6.26
(gdb) file linux-2.6.26/vmlinux
(gdb) target remote :1234
(gdb) hb start_kernel
(gdb) c
gdb -tui 可以开启窗口实时查看代码 只有使用hb才能打断点,这是gdb的bug导致的gdbserver inside qemu does not stop on breakpoints
觉得每次输入file和targer麻烦的,可以创建gdb的默认启动命令
$ echo """
file linux-2.6.26/vmlinux
target remote :1234
""" > /root/.gdbinit
$ echo """
set auto-load safe-path /
""" > .gdbinit
Vscode
如果你是使用vscode浏览源码,可以参考这个文章vscode在linux下搭建内核驱动开发环境
参考链接
elf_i386或elf_x86_64:没有那个文件或目录 解决方法
内核2.6.22.6编译出现 undefined reference to __mutex_unlock_slowpath
linux 内核编译错误 .size expression for copy_user_generic_c does not evaluate to a constant